
Candido Film in the Studio: ECN-2 Development, Exposure Index and Noir Lighting in Practice
I recently did a professional studio session produced in collaboration with Candido Collective, with Nadia Dutchak modelling and hair and make-up by Iryna Pasechnik. The objective was was to demonstrate how motion picture film behaves when exposure index, lighting structure, development chemistry and scanning are treated as one continuous workflow.
All colour film was supplied by Candido and processed in ECN-2 chemistry at Liquid Light Lab. The black and white images were shot on Rollei RPX 400. The session was structured deliberately from the first lighting decision through to final scan, and every stage was handled with the understanding that film rewards precision if every step of the workflow is followed.
The final image is not constructed in post-production. The tonal structure begins at exposure, is fixed in the negative through development, and is preserved in the scan. Grading is the final stage of that process, not a correction of it. It refines highlight roll-off, midtone separation and colour balance that already exist within the negative.

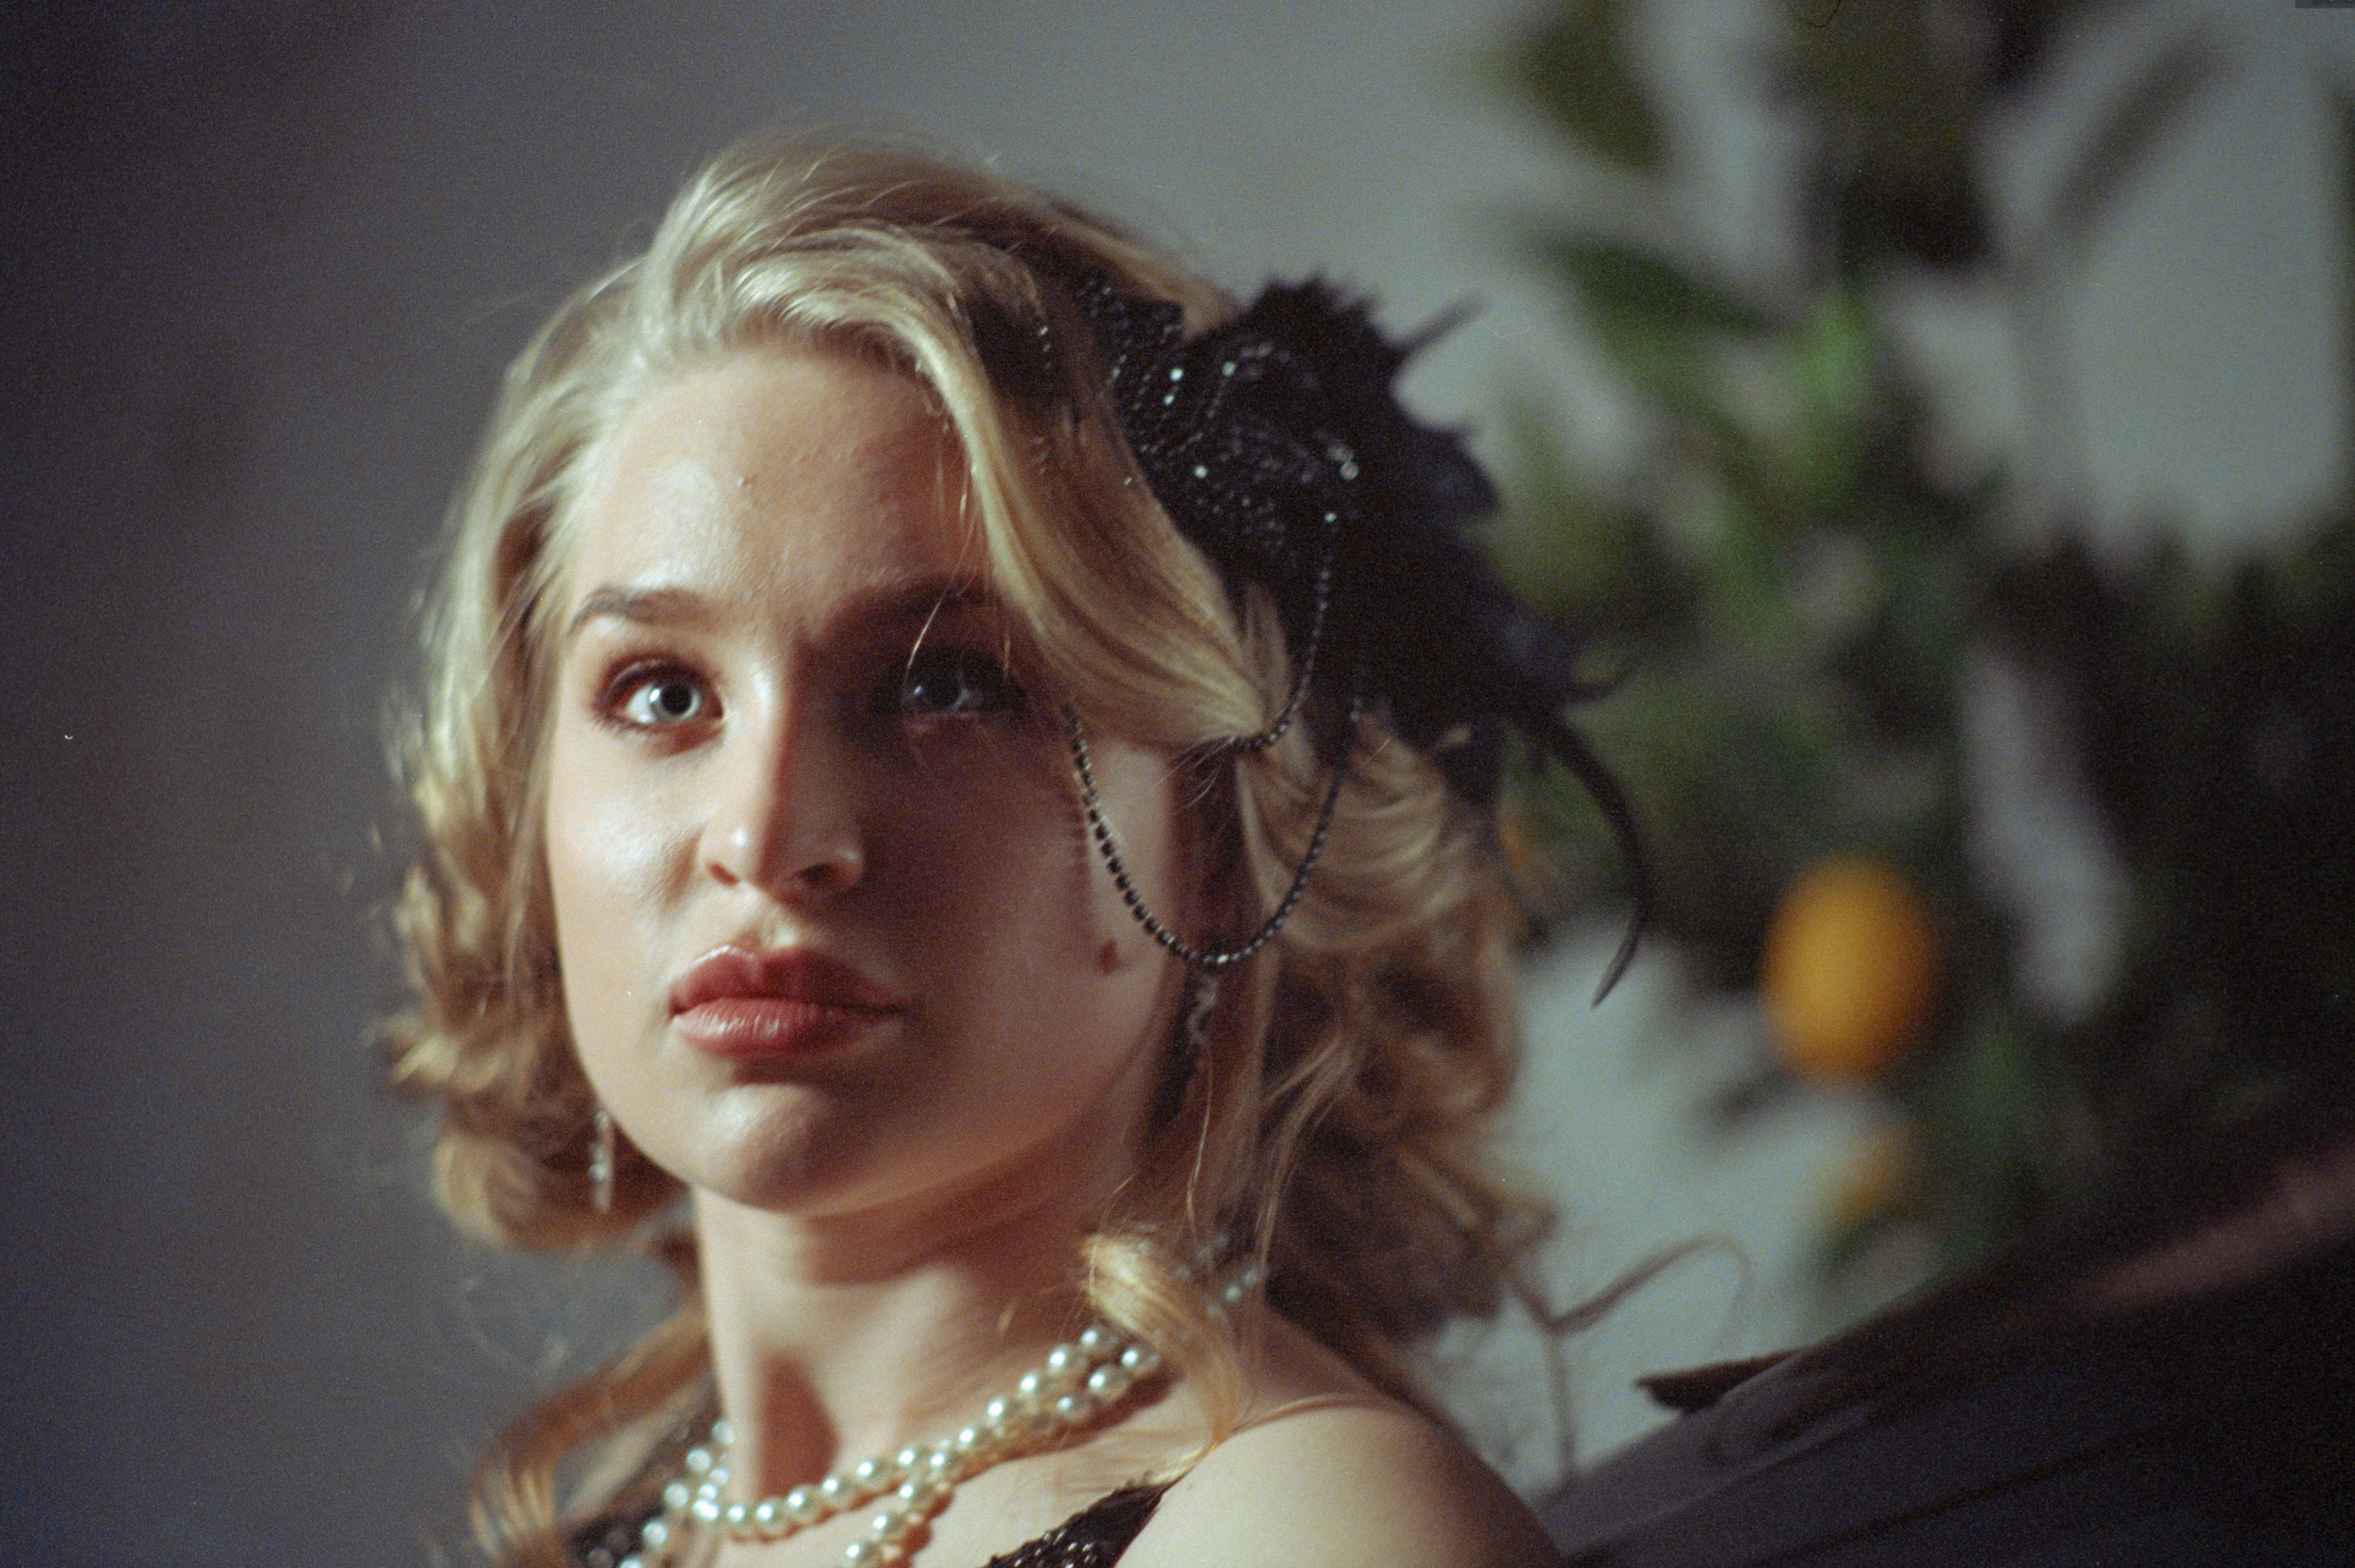
Rollei RPX 400 shot at EI 400 to demonstrate the structured noir lighting, with the bare-bulb key softened through a scrim to shape highlight transitions.
That distinction matters, particularly with Kodak Vision3-derived film such as Candido 400. Vision3 is not engineered primarily for optical printing in the traditional darkroom sense; it is designed from the ground up for digital intermediate workflows. In motion picture production, the negative is scanned at high bit depth and graded digitally. The film is optimised to retain highlight latitude, smooth roll-off and extensive tonal information specifically so that it can withstand scanning and colour grading without breaking apart.

Candido 400 exposed to increase negative density, processed in ECN-2 chemistry and scanned without tonal compression before grading.
When still photographers treat Vision3 as if it were conventional C-41 print film, they often miss this fundamental design philosophy. The emulsion holds far more highlight detail than a standard print-oriented negative, but only if that density is preserved in exposure and maintained through development and scanning. If the scan compresses the top end early, or if the development alters the intended curve, the advantage built into the film is lost.
In this session, exposure index was chosen to increase negative density intentionally. That density was not reduced or manipulated in development. The ECN-2 process preserved the native curve and highlight latitude of the emulsion. The scan was performed in a way that retained the full tonal range before grading was introduced. As a result, the grading stage refined colour and contrast without manufacturing structure that was not already present.
Vision3’s strength lies in its ability to carry subtle highlight information and smooth transitions through to a digital grade. When handled correctly, it behaves exactly as it was designed to: a capture medium that anticipates scanning, not a print medium that requires reinterpretation. The final images reflect that continuity. They are the product of exposure, chemistry and scan discipline working in alignment, rather than software attempting to compensate for lost information.
Exposure Index as a Creative Control
Candido 400 is derived from Kodak Vision3 250D. For this session it was rated at EI 200 to give the emulsion more light. More light increases negative density, particularly in the shadows, which in turn increases tonal separation. That denser negative allows highlight roll-off to remain smooth while preserving information across midtones and darker values.
Development was kept normal in ECN-2. There was no push, and there was no compensation to counter the exposure decision. The intention was to allow the film’s native curve to remain intact while benefiting from the increased density created in camera.
The result is a colour negative that scans with generous highlight latitude and a gently moderated colour intensity. The slightly pastel quality in the graded images is not a stylistic overlay; it is the natural outcome of controlled overexposure combined with stable development.
The black and white work followed a different logic, and it’s here to show pure lighting structure without colour affecting perception. I rated Rollei RPX 400 at box speed.
Exposure index, when understood properly, determines how much information survives into development and scanning. It is the first structural decision in the chain.
Constructing the Light

Quick continuity check at the piano while Nadia holds position, with the horizontal gridded strip already set behind for controlled edge and depth in the lighting.
The lighting build was deliberate and hands-on. The primary key light was a bare bulb fitted with barn doors to control spill precisely. A scrim was placed in front of the bulb to soften the output while preserving directionality, creating smooth highlight transitions without flattening facial structure.
To the right of the subject, a strip light fitted with a grid was positioned to shape the shadow side. The grid ensured that fill remained contained and did not wash across the background or dissolve the negative space that gives noir lighting its depth. Its role was subtle but essential, refining separation without eliminating contrast. In a twist to normal use the strip box was placed horizontally, not vertically.
Two assistants worked continuously under direction, adjusting barn doors, repositioning the scrim, and fine-tuning the strip’s angle as Nadia moved within the set. The lighting was not static. It was adjusted in response to how density gathered across cheekbones, shoulder lines and fabric texture.
Hair and make-up were designed specifically to respond to side light. Iryna’s work emphasised definition and surface quality so that the lighting would articulate shape rather than overpower it. Nadia engaged with the light rather than posing independently of it, allowing the tonal pattern to guide movement and expression.
The atmosphere in the studio was focused but fluid, with every adjustment measured against the negative’s response rather than the rear screen alone.
Optics and Rendering

My Leica M3 was paired with the Voigtländer 50mm f/1.1. The large rangefinder magnification of the M3 makes precise focusing possible even wide open at f/1.1, which keeps the pace of the session fluid and allows the model to remain in rhythm rather than waiting on technical adjustments.
The lenses used were a 1939 Sonnar 50mm f/1.5 and a Voigtländer 50mm f/1.1. These lenses shape micro-contrast and highlight behaviour in distinct ways. The Sonnar produces smooth tonal transitions that complement structured side lighting, while the Voigtländer introduces a different balance between clarity and glow.
Optical rendering influences far more than simple sharpness. It determines how highlights bloom, how contrast transitions behave, how edges resolve, and how the image breathes under structured light. When combined with deliberate exposure index decisions, the lens becomes an active participant in shaping tonal direction rather than a neutral conduit between subject and film.
How a lens draws is paramount to the final look of an image because film does not record scenes in isolation; it records the interpretation delivered by the optics. A lens with strong micro-contrast will emphasise separation between adjacent tonal values, giving shadow edges a firmer structure and midtones more articulation. A lens with smoother transition characteristics will allow highlights to roll gently into surrounding tones, producing a more cohesive and less clinical rendering. These behaviours are optical in origin, not chemical, and they are embedded into the negative before development ever begins.
In structured noir lighting, this becomes critical. Side light exaggerates transitions between illuminated and shadowed planes. A lens that resolves edges abruptly can make that transition feel harsh, while a lens that draws with smoother gradation can maintain depth without brittleness. Highlight bloom at wider apertures also affects perceived latitude. A slight glow around bright areas can soften the boundary between highlight and midtone, supporting smoother roll-off when the film is rated for increased density.
When exposure index is lowered to build density in the shadows, the lens’ drawing style determines how that density is perceived. If the optic maintains strong separation in low-contrast areas, the added exposure translates into visible tonal layering. If the lens flattens micro-contrast, the same density may feel less dimensional. The exposure decision and the optical rendering therefore interact directly.
The 1939 Sonnar and the Voigtländer 50mm f/1.1 used in this session each bring distinct rendering characteristics. The Sonnar’s classic optical formula produces smooth transitions and cohesive midtones that complement directional lighting, while the Voigtländer offers a different balance of clarity and highlight behaviour that changes the character of the same light. Neither lens is interchangeable in effect, even under identical lighting ratios and exposure settings.
Film records what the lens gives it. Development preserves what the film records. Scanning translates what the development reveals. If the lens draws with intention, the entire chain benefits. If it does not, no amount of careful processing can introduce a rendering quality that was never present in the first place.
True ECN-2 Film Development in the UK
All colour film from this session was processed in dedicated ECN-2 chemistry at Liquid Light Lab. Motion picture negative is engineered for ECN-2, and processing it correctly preserves the intended tonal curve and highlight latitude of the emulsion.
Remjet removal, temperature control and development consistency are not optional details. They are part of maintaining the density created during exposure. Because the film was rated intentionally, development needed to remain stable to preserve that density accurately.
For photographers shooting Candido film or Kodak Vision3 in the UK, correct ECN-2 processing ensures that the negative retains its full latitude before it reaches the scanning stage.
Candido 400 processed in ECN-2 and scanned to preserve full negative latitude. This is the straight scan, with no grading applied.
The same frame after colour grading. Density built in camera is shaped rather than corrected, preserving highlight roll-off and tonal separation.
Scanning for Grading Latitude
Motion picture negative is engineered differently from conventional stills print film. Stocks derived from Kodak Vision3 are designed to tolerate significant highlight exposure while maintaining controlled roll-off through the shoulder of the curve. Bright skin, practical lamps and specular reflections do not clip abruptly; they compress gradually, holding separation further up the tonal scale. That extended highlight latitude is one of the defining characteristics of motion picture emulsions, but it only survives if the scan captures the density structure faithfully.
A negative contains density, not brightness. The thicker the density in the highlight areas, the more information is present in that region. If a scanner applies contrast decisions during capture, or interprets the negative through a built-in colour profile designed for standard C-41 printing workflows, that density is reshaped before it is fully recorded. Once highlight compression has been baked into the scan, the subtle transitions that define Vision3’s shoulder cannot be restored.
This is where the limitation of traditional mini-lab scanners becomes clear. They are optimised for speed, automated correction and high-volume throughput. Their internal colour science assumes a conventional stills negative intended for quick print output. Automated white balance, contrast curves and channel balancing are applied as part of the capture process. That approach works well for consumer C-41 film, but it is not designed to preserve the extended dynamic range and density structure of motion picture stock processed in ECN-2 chemistry.

Rollei RPX 400 developed in Pyro chemistry. The proportional stain reinforces highlight separation along the cheekbone and shoulder while holding depth in the shadow side of the face. That extended tonal structure requires high bit-depth scanning to retain the full range; automated mini-lab workflows compress this type of negative too early.
For this project the negatives were scanned without automatic contrast or colour correction, at high bit depth, so that the full tonal range of the film was captured before grading. The goal at the scanning stage is to record the full tonal range of the negative at high bit depth before any aesthetic decisions are introduced. No contrast shaping or colour normalisation is applied during capture. The file created at this stage is deliberately neutral and complete, holding highlight density, midtone separation and shadow information intact.
Only after that full range has been secured does grading begin. Because the highlight shoulder and shadow depth are already preserved in the scan, colour balance and contrast can be refined without forcing the image into shape. Adjustments become controlled tonal direction rather than recovery. The grade extends the exposure and lighting decisions made in the studio instead of compensating for information lost at the scanning stage.
When scanning respects the negative and avoids automated compression, grading becomes a continuation of the original photographic intent. Exposure index, lighting ratios and ECN-2 development establish the tonal architecture. A density-accurate scan preserves it. The final grade then clarifies it. That continuity is not achievable when the negative is interpreted through a mini-lab system designed for print convenience rather than motion picture latitude.
From Professional Shoot to Film Workshops

Directing the session as light and composition are carefully refined before the next frame is exposed.
This session forms the foundation for upcoming film workshops built around practical control rather than abstract theory. The programme will cover lighting ratios for film, positioning and shaping light to protect negative latitude, aperture selection and depth control, directing and working confidently with models under structured lighting, and developing a clear understanding of how exposure index and development interact in real-world conditions.
The aim is to give photographers a hands-on understanding of how to build density in camera and carry it cleanly through development and scanning. Instead of treating film as unpredictable or temperamental, the workshops will focus on repeatable, structured techniques that deliver consistent, professional results.
If you would like to be the first to hear when workshop dates are released, join the Liquid Light newsletter. Subscribers receive early access to booking, detailed workshop outlines, and updates on future studio sessions and lab developments.
ECN-2 Development and Professional Scanning
If you are shooting Candido colour film, Kodak Vision3 or any motion picture stock, the way your negatives are processed and scanned will determine whether that latitude survives. Motion picture film is not designed for automated correction or print-oriented workflows. It is engineered for controlled exposure, careful development and high bit-depth scanning before grading.
At Liquid Light Lab, ECN-2 processing is handled specifically for motion picture emulsions, not adapted from C-41 convenience systems. Negatives are scanned in a way that separates capture from interpretation, ensuring that highlight roll-off, midtone separation and shadow structure are retained before any tonal shaping begins.
If you are investing in Vision3-derived film, the lab stage should not reduce what the emulsion was designed to hold.
ECN-2 development and high bit-depth scanning are available through Liquid Light Lab for photographers who require their motion picture negatives translated accurately and prepared properly for grading.
Book your ECN-2 development directly through the lab to maintain the full latitude of your next roll. Candido shooters benefit from our dedicated development and scan bundles offered through our technical partnership with Candido Collective.
Model: Nadia Dutchak - @nadia_dutchak
Hair & Make Up Artist: Iryna Pasechnik - @i_pasechnik
Images Developed and Scanned in House - @theliquidlightlab
By Martin Brown | Liquid Light Whisperer