
Directional Light on Film: Building the Chiaroscuro Portrait (Part II)
Practical ratios, subject placement, and the behaviour of film under sculptural light
Part I established chiaroscuro as a directional lighting system: a way of shaping depth, defining planes and controlling tonal structure through a disciplined light-source approach. This second part turns the system into practice. It explains how the lighting decisions were made, how ratios were controlled, how film responded, and why the lenses and emulsions used in these portraits influence the way light is recorded.
The aim here is clarity. Chiaroscuro is not mysterious, nor is it a stylistic flourish. It is a practical, repeatable method. When built with intention, film records the structure of the light cleanly and predictably. The following examples show how this works in a real portrait and boudoir session, using both black-and-white and colour negatives.
Understanding Ratios: The Foundation of Depth
Chiaroscuro begins with a simple idea: the difference in brightness between the lit side of the subject and the shadow side. This difference is the light ratio, and it determines how sculptural or gentle the portrait will appear.
A small difference between the two sides creates a subtle, rounded shape. A larger difference produces the recognisable sculptural depth associated with classical portraiture and mid-century cinema. At even stronger ratios, the shadows begin to take on narrative weight, and the illuminated planes appear almost architectural.
In this session the separation between the lit and shadow sides typically sat at a ratio between six and ten to one. This equates to roughly three to three and a half stops of difference between the light and shadow sides, producing a sculptural chiaroscuro without collapsing the shadow plane. Film responds exceptionally well to this level of contrast: even with deep density, the negative retains texture that remains fully recoverable in the scan and darkroom.
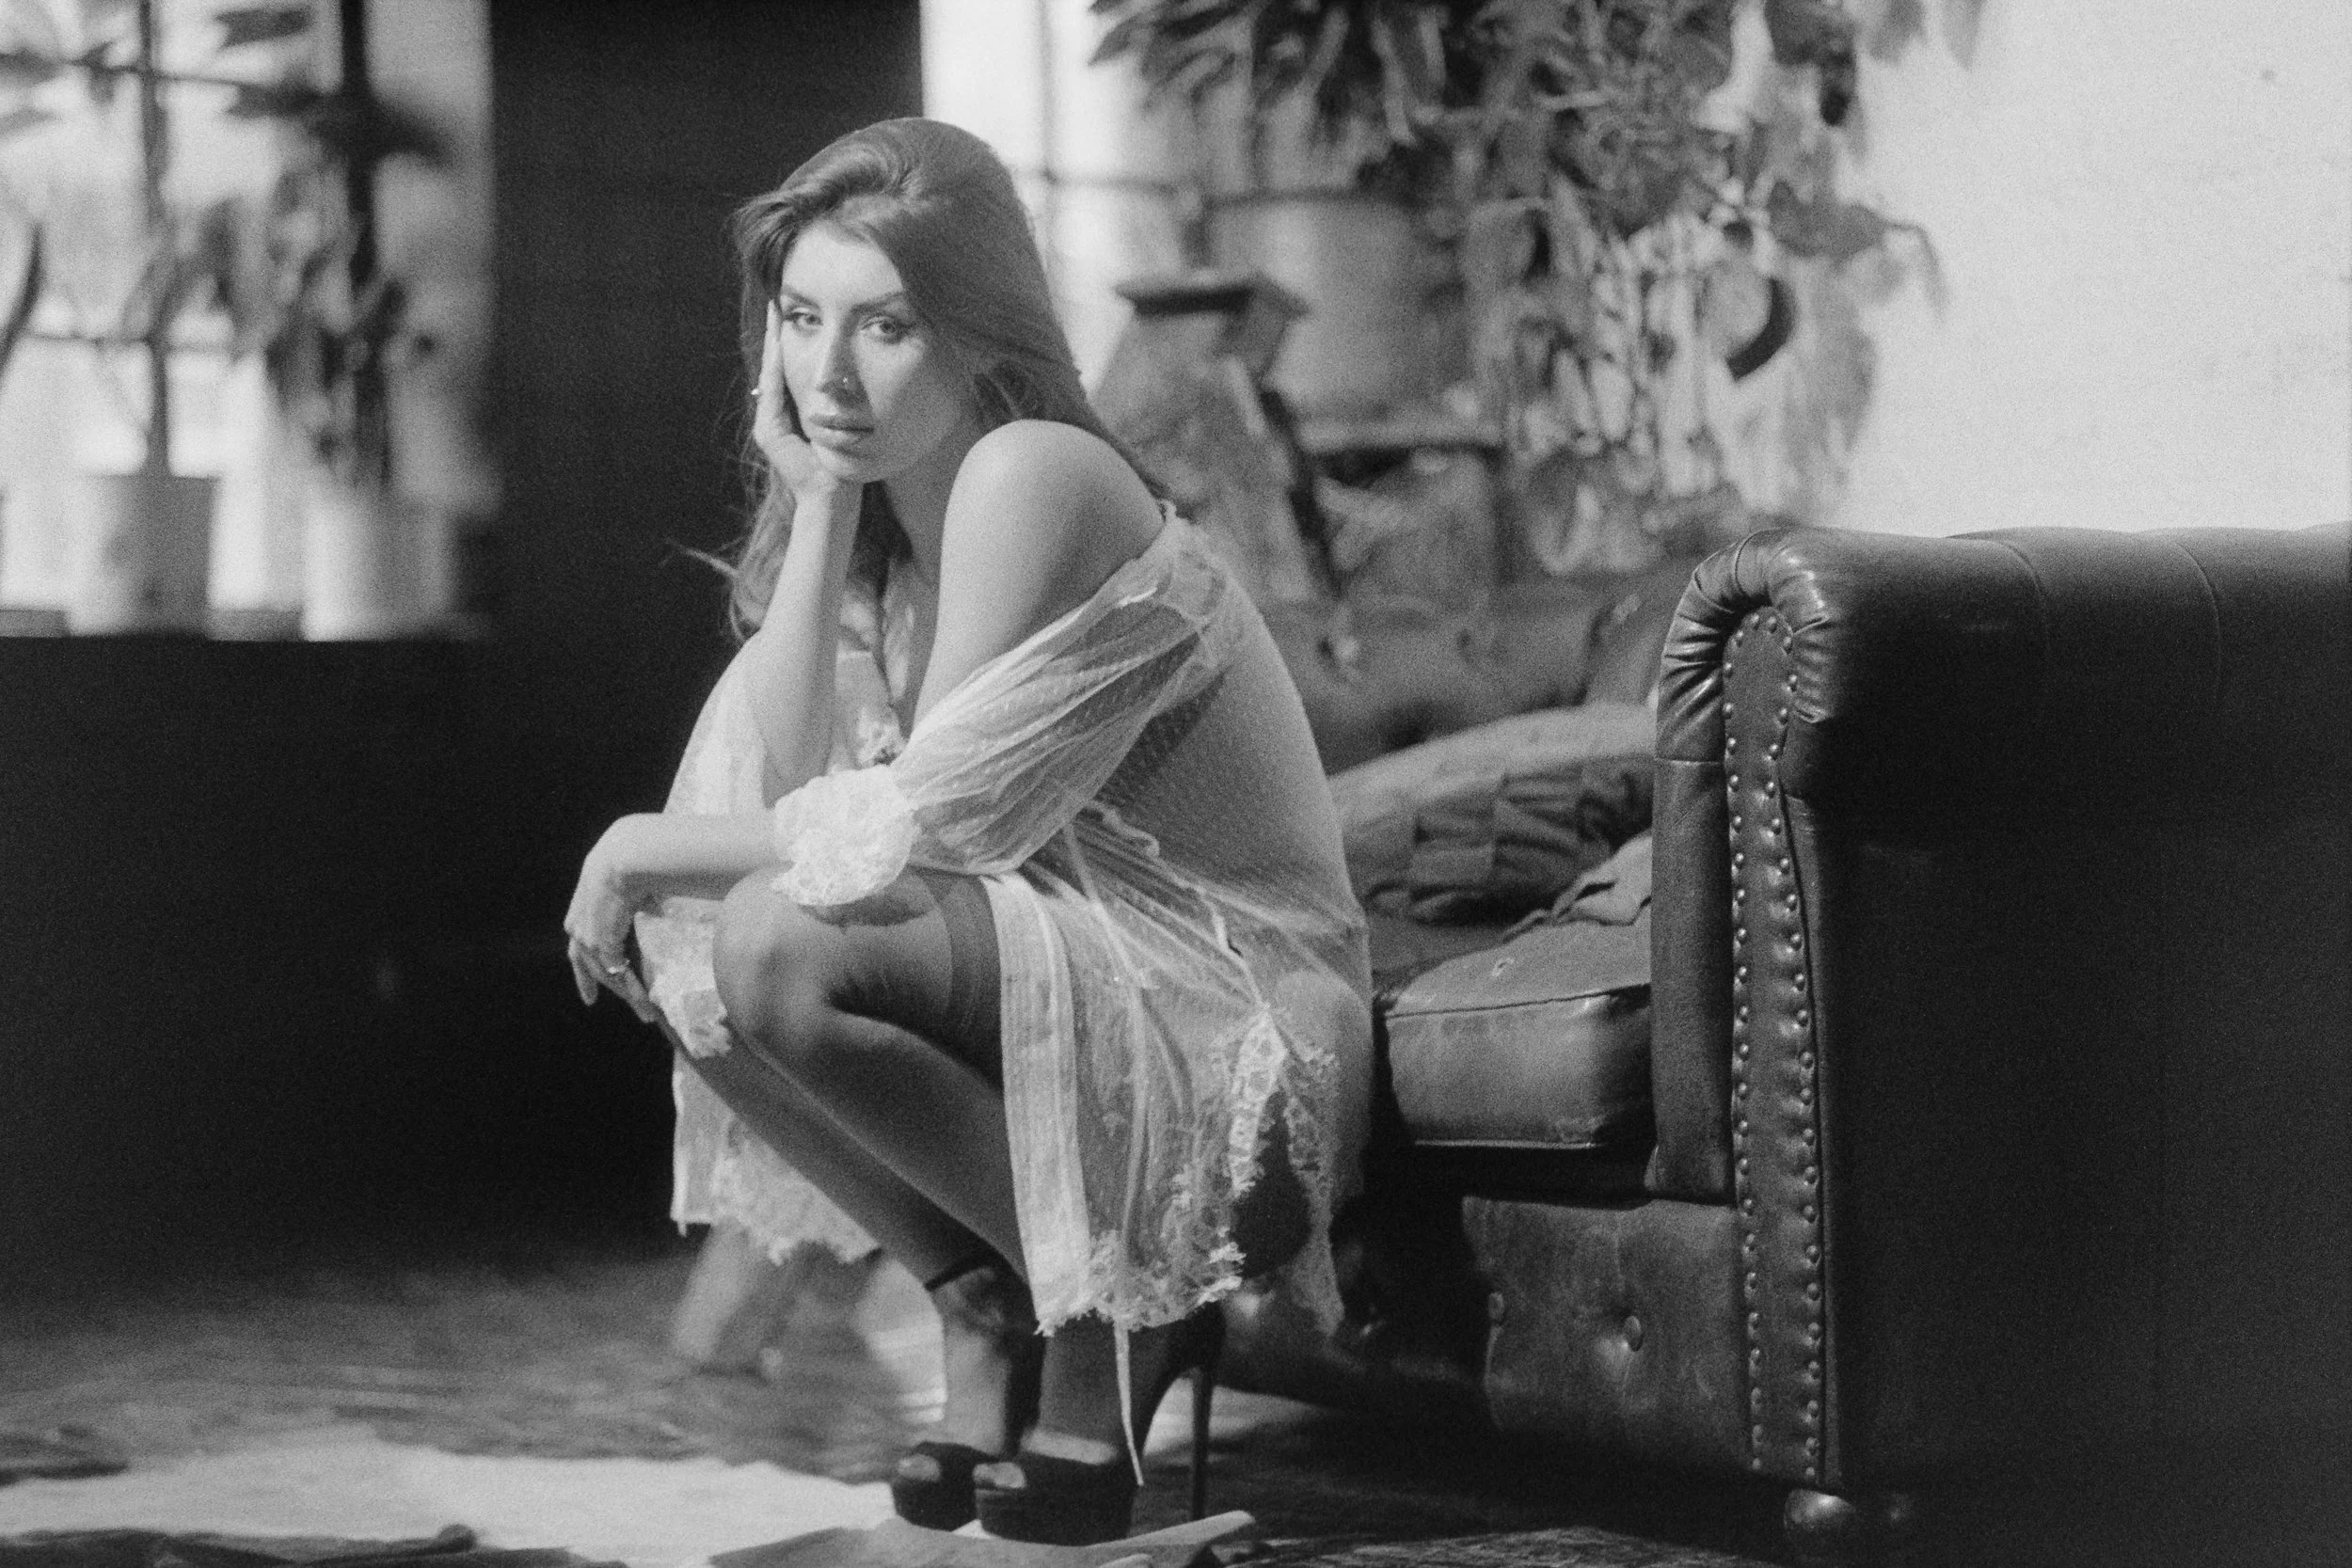
A structured chiaroscuro example: the key light shapes the left side of the face and torso while the shadow side remains dense but fully recoverable on the negative. This frame demonstrates the session’s typical range of 1.5 up to 3:1 ratio and the stability of RPX 100 under directional light. The lens is a 1939 Zeiss Sonnar 50mm f/1.5.
How the Ratio Was Built On Set
Because the room had large windows, the first step was to measure the ambient light on the shadow side of the subject. This establishes the baseline density. Once that reading was set, the key light—a single continuous lamp with a parabolic modifier—was brought in gradually until the illuminated side of the face and torso reached the desired separation from the shadow reading.
This approach keeps the lighting coherent. Instead of fighting the existing ambient light, the ambient becomes something to control and shape. If the windows lifted the shadows too much, a simple piece of negative fill was added to draw the density back into alignment with the intended ratio. Everything remained based on that first decision: which side would be the shadow side, and how deep the shadow should be.
The result is a lighting structure that does not drift. Once the ratio is set, the rest of the portrait is built around it.
“I cannot recommend Martin highly enough for anyone looking for an exceptional photographer who truly understands the art of light. He is incredibly respectful and creates a safe, comfortable environment on set. ”
The Room as Part of the Lighting System
Chiaroscuro does not require isolating the subject from the environment. In practice, the environment is part of the toolset. Walls can lift shadows gently, narrow rooms deepen falloff, and furniture blocks spill in ways that help maintain directionality.
In this session the environment played a controlled role: the wall opposite the key light provided just enough reflected lift to keep the shadow plane readable without softening the sculptural depth. The background naturally fell away as the parabolic modifier shaped the light forward rather than outward. No second light was needed. The room became the modifier.

Environmental chiaroscuro: the key light shapes the subject while the room contributes controlled ambient lift from the window and natural falloff into shadow. The space functions as an extension of the lighting system. The lens was the 1939 Zeiss Sonnar 50mm f/1.5.
How Lenses Shape Chiaroscuro: Three 50mm Designs, Three Ways of Sculpting Light
In chiaroscuro portraiture the lamp defines the direction of the light, but the lens defines how that light transitions across the subject. This is often treated as a stylistic choice, yet in analogue work the lens is part of the lighting system itself. It determines the character of the shadow edge, the softness or firmness of the midtones, and the way the highlight rolloff supports the geometry created by the key light.
For this session three fifty-millimetre lenses—each from a different optical lineage—were used not to vary focal length but to demonstrate how the choice of lens influences the shape of chiaroscuro.
The Voigtländer Nokton 50 mm f/1.1 produces a deep, spherical falloff when used wide open. The transitions are smooth rather than abrupt, and the separation between foreground and background is created as much by optical behaviour as by lighting ratio. In chiaroscuro this creates a soft, atmospheric contour where the core shadow remains intact but the surrounding tones dissolve gently into the room.
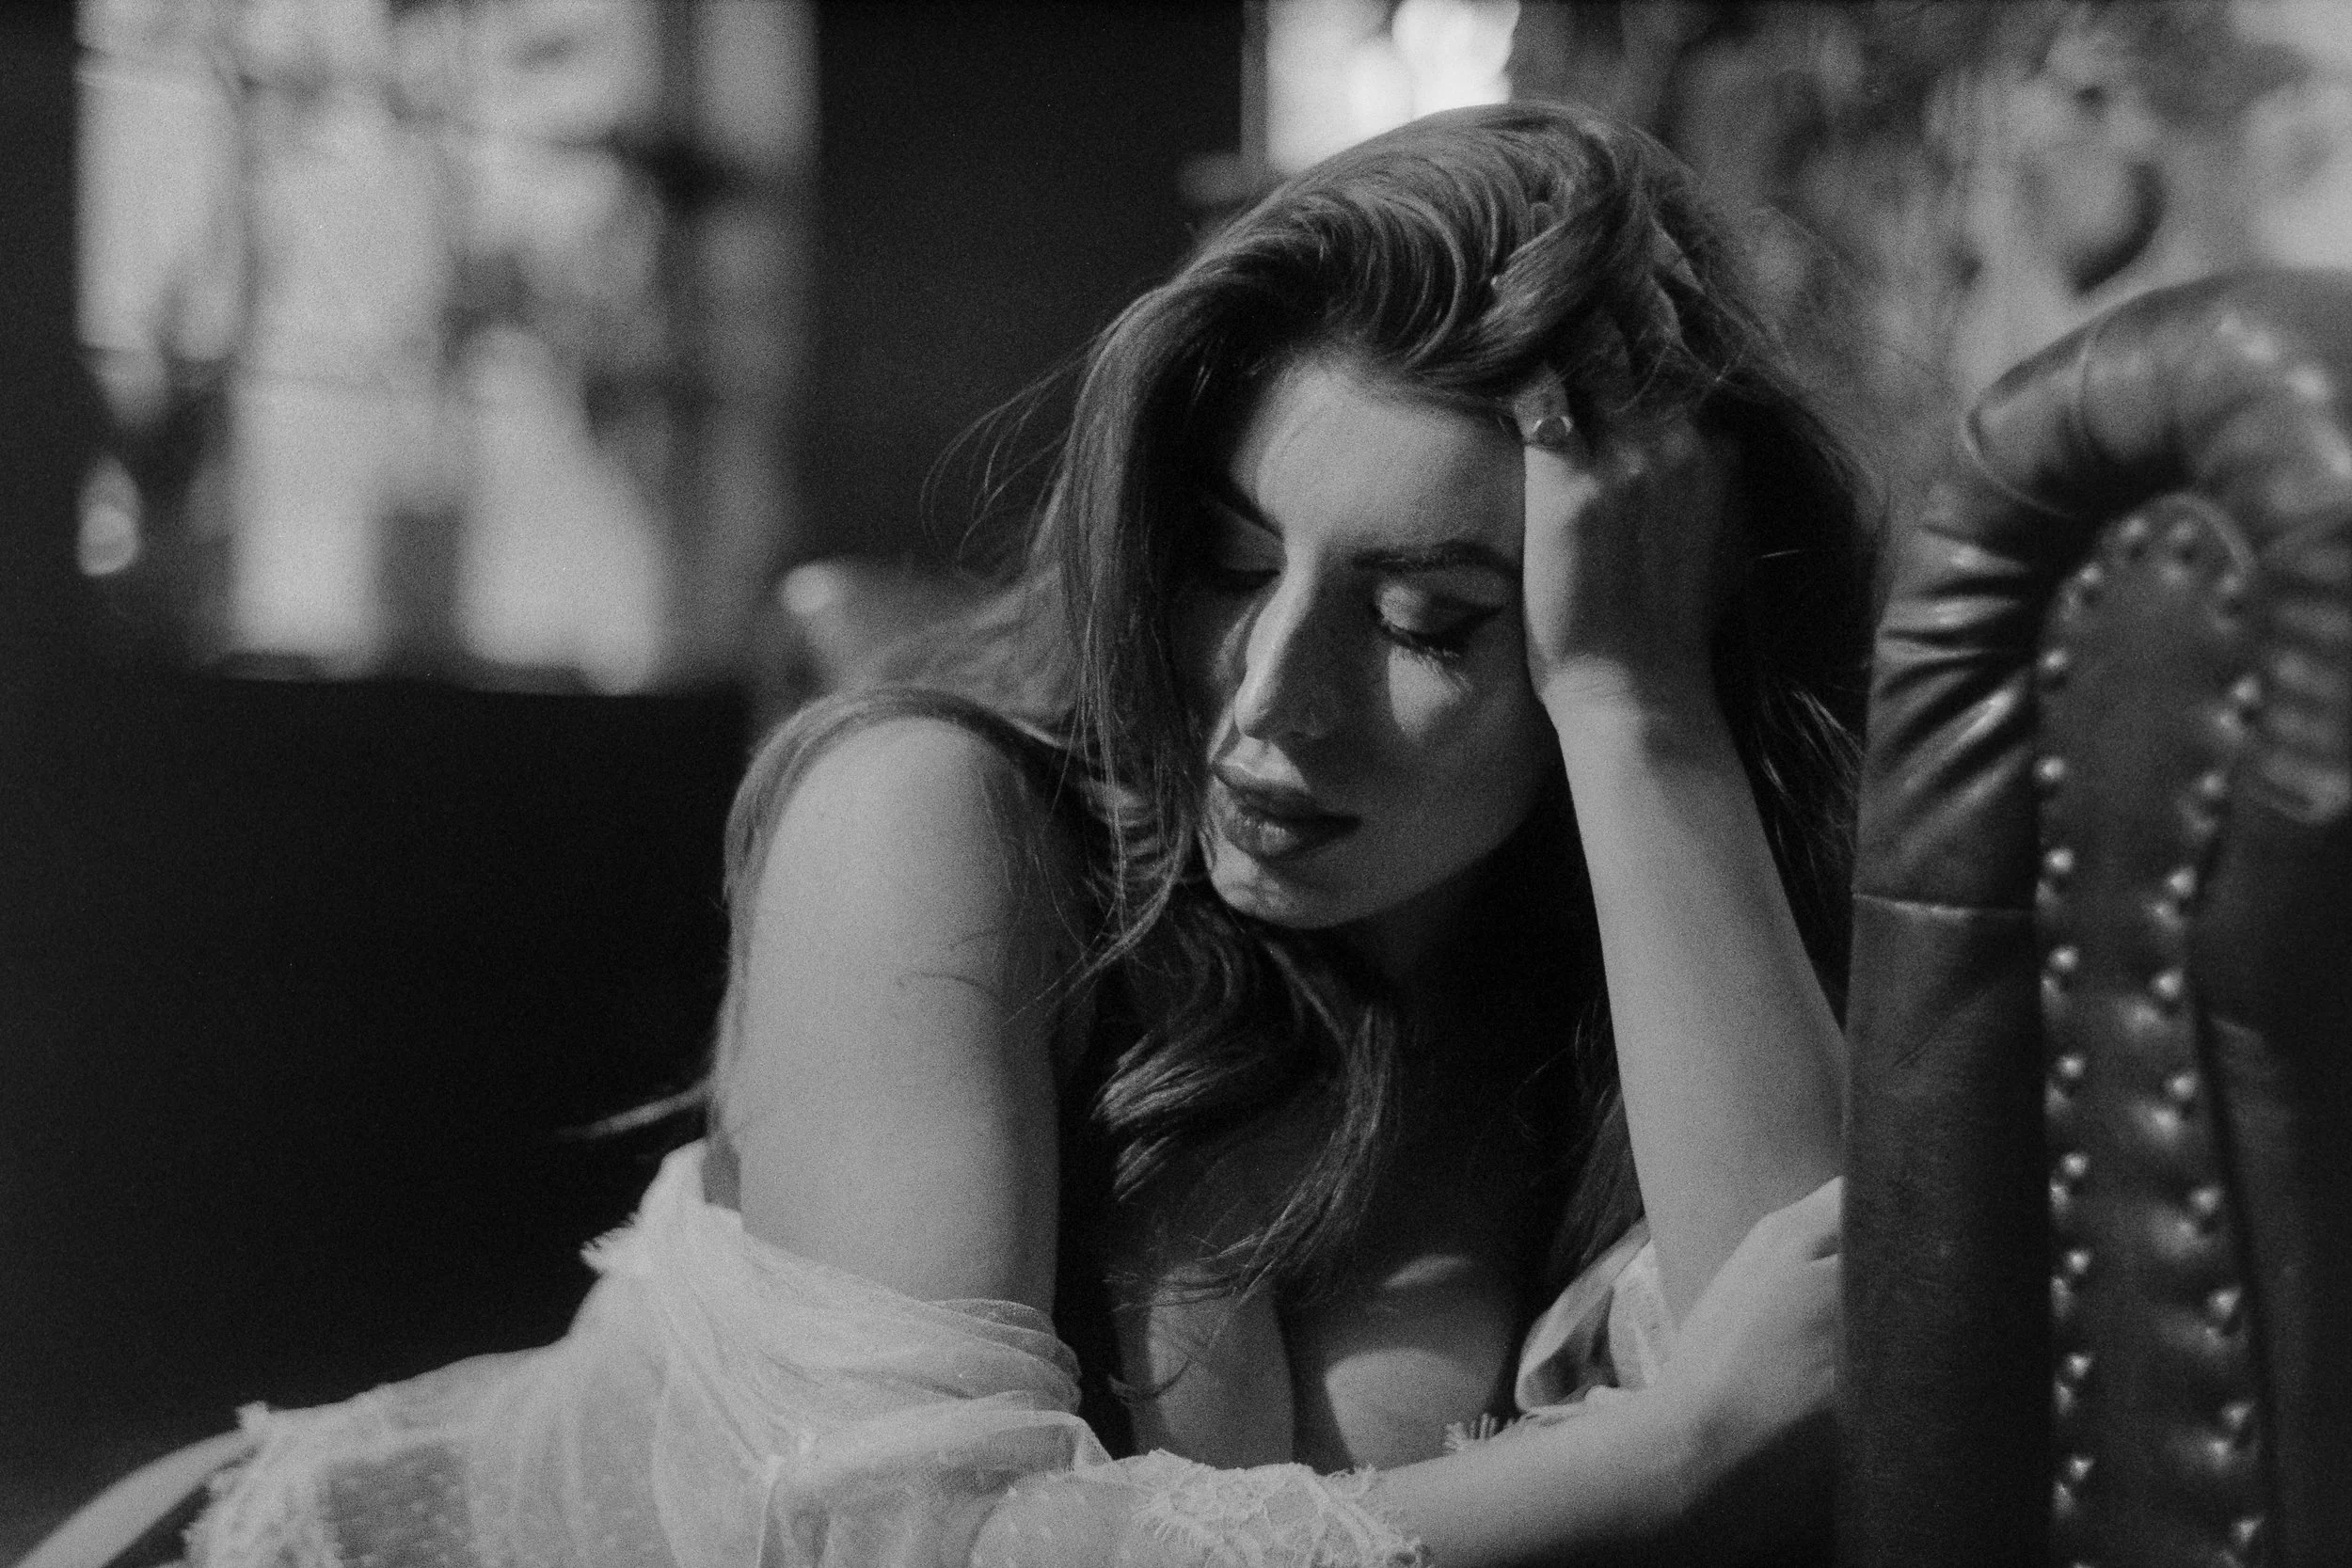
A chiaroscuro portrait shaped by a single directional key meeting controlled window lift. The Voigtländer Nokton 50 mm f/1.1 softens the transition where the key light meets the ambient window glow, producing smooth spherical falloff while keeping the core shadow intact.
The 1939 uncoated Zeiss Sonnar 50 mm f/1.5 represents one of the earliest intentional designs for sculptural light. Its rendering preserves the essential modelling created by the key but softens the shadow boundary through very gradual tonal compression. In monochrome chiaroscuro the Sonnar behaves almost as a continuation of the light itself: the modifier sets the geometry, and the Sonnar translates that geometry into a long, cohesive tonal gradient.
The Zeiss Pancolar 50 mm f/1.8 in its thorium zebra version behaves differently again. Its microcontrast is higher, the transitions between zones are firmer, and the shadow edge reads with more precision. In chiaroscuro this produces a slightly more graphic result. The direction of the key becomes more explicit, the planes of the face separate clearly, and the environmental falloff tightens. It is effectively a harder interpretation of the same lighting architecture.

A Pancolar interpretation of the lighting: higher microcontrast tightens the shadow edge, defines the facial planes more explicitly, and produces a more graphic chiaroscuro.
Each lens therefore represents a different way of sculpting the light that already exists. The key, the ratio and the falloff remain the same; what changes is how the lens interprets the movement of light across the subject. In analogue chiaroscuro this is not a matter of style but of structure: three lenses under one lighting design create three distinct renderings of the same sculptural form.
How Film Stocks Shape the Light
Once directional light is in place, the next component of chiaroscuro is the way that light behaves once it reaches the film. Film does not interpret; it embodies the light through chemical density. Rollei RPX 100 holds midtones with exceptional stability and reads sculptural light cleanly. RPX 400 produces a firmer, more graphic result with stronger shadow structure. Vision3 500T, used for some of the colour work here, responds to chiaroscuro the same way it does in cinema: it compresses highlights smoothly and maintains colour stability even under strong ratios.
The examples illustrate these behaviours clearly.

A Zeiss Sonnar rendering of chiaroscuro on Rollei RPX 100 film: long, cohesive tonal transitions and gentle shadow rolloff give the portrait its sculptural softness.
Exposure Placement and Negative Density
In chiaroscuro, exposure is not a matter of making the image bright or dark. It is the placement of shadow density on the negative. Once the ratio is set, exposure determines how much detail the shadow plane will carry and how the midtones will define the subject’s form.
Film handles directional light exceptionally well because its characteristic curve allows highlights to compress rather than clip. This means exposure is generally chosen to protect highlights while letting the shadows fall naturally into density. The negative will hold far more information in those zones than a digital file would, and scanning recovers them cleanly.
In the monochrome examples shown in this article, midtone authority comes directly from this exposure logic. The shadows possess weight rather than emptiness, and the highlights maintain texture without flattening.

Directional light meets controlled window lift: Vision3 carries the sculptural chiaroscuro while the colour palette remains stable and the deep room falloff reinforces the scene’s depth.
Colour and Black & White Chiaroscuro
Although chiaroscuro is often associated with monochrome work, colour film can carry structured light extremely well. The Vision3 examples in this session demonstrate how directional light retains its shape while the colour palette remains stable. Skin tones compress smoothly in the highlights, and the shadows preserve detail without unwanted colour shifts.
Black and white film makes the geometry more explicit by removing chromatic distraction. RPX 100 and 400 both reveal how the light wraps around the subject and how the background falloff reinforces the depth of the scene.
Each medium supports chiaroscuro in a different way, but the underlying structure remains the same.
Case Studies from the Session
These portraits illustrate chiaroscuro functioning across different lenses, film stocks and positions in the room. The underlying logic remains consistent: a correctly shaped key light, a measured ratio and a disciplined exposure decision.
Each portrait emerges from the same structured process.
Examine each image, which also has its lens and film choice in each caption. A large parabolic modifier was used, camera left, to both emulate and blend the window light streaming through the windows. Cohesive, directed, and motivational light is the key factor in creating your image mood, depth, intent, and complexity.
A Practical Workflow for Building Chiaroscuro
Measure the ambient light on the shadow side to establish baseline density.
Introduce the key and adjust distance until separation appears.
Check the shadow side again and add negative fill where needed.
Expose for highlight integrity.
Once the structure is correct, frame and make the exposure.
This ensures that chiaroscuro remains consistent from shot to shot, even when changing lenses, films or environments. The negative becomes a physical record of the lighting architecture.

The key light shapes the face and upper body while the window on the left lifts the deep shadow values just enough to keep the chiaroscuro readable. The long falloff across the room reinforces the directional structure without flattening the contrast.
Conclusion: Light as Structure, Film as Record
Chiaroscuro is a geometric system built from a single directional decision. The lens defines the texture of that structure, and the film records it as density. When these elements align, the portrait carries depth and presence not because of post-production but because the lighting was built with intention. This chiaroscuro method is the foundation of all commissioned portrait sessions at Liquid Light Whisperer. Read more on the Portrait Photography service page.
Part III will move into shaping tools, spill control and the refinement techniques used in cinema to maintain contrast and directionality in more complex environments.
By Martin Brown | Liquid Light Whisperer
All portraits were developed and scanned in-house at Liquid Light Lab, Leamington Spa.
All images feature the exceptional model Ella Rue, who can be followed on Instagram here: @ella.rue_ and you can follow here photography journey here: @ella_rue_photography